Chicken Pies – Lunchbox Ideas

I am always looking for or thinking of new ideas for Imana’s lunchbox. I like her lunchbox to be varied with great food.

image

To make these Chicken Pies you will need.

75 g pancetta / bacon cut into small strips

1 punnet of chicken mini fillets (you may use thighs or chicken breast approx 420g)

1tsp cornflour

1 small onion finely chopped

1 tsp chopped sage / parsley

100ml chicken stock

2 sheets of ready to roll shortcrust pastry

1 egg yolk

salt & pepper

Preheat your oven to 200C / 180C Fan.

1. Cook the pancetta / bacon in a large non stick frying pan for 3 – 4 mins until crisp and golden brown, Remove from pan.

2. Cut the chicken into 1cm pieces and dust with the cornflour. Add the chicken to the pan with the onions and cook approx 8 mins then add the herbs followed by the stock. Bring to the boil and season with salt and pepper then leave to cool.

Cut / stamp out 6inch for the bottom and 3 inch for the top (i used a small saucer and a ramekin). Place the 6inch dish in the bottom of a muffin tin.

Stir the pancetta into the chicken and scoop into the muffin tins. Wet the edge of the pastry and add the smaller discs ontop. Press the pastry together and make a small hole in the top of the pies.

image

Mix the egg yolk with a pinch of salt and brush onto the top of the pies. Bake for 20 – 25 mins until the pastry is crisp and golden. Leave to cool.

You can wrap these in greaseproof paper. You can also freeze these.

image

Gingerbread

Imana loves baking… if she could she would be happy to bake something every day.  The easiest thing for me to do is give her a few cook books and she will page through them and decide what to make from the pictures. Like mother like daughter. I could spend hours reading or leafing through my collection.

Her pick today is from one of my favourite cookbooks ‘The Hummingbird Bakery’ surprise surprise Gingerbread was chosen.  The recipe is super simple although it requires a little patience.  The dough has to be made then left to rest over night.

Usually toddlers of this age can be impatient, because we bake quite alot and usually when making biscuits or cookies the dough needs to rest so there is no argument or resistance.

image

Here is the recipe

400g plain flour
¾ tsp bicarbonate of soda
2tsp ground ginger
2tsp ground cinnamon
½ tsp ground allspice
¼ tsp ground nutmeg
½ tsp salt
180g unsalted butter, at room temperature
125g soft dark brown sugar or dark muscovado sugar
1 egg
125g black treacle
(If you are using regular / salted butter leave out the salt)

Method
Sift together the flour, bicarbonate of soda, ginger, cinnamon, allspice, nutmeg and salt in a large bowl and set aside. 
Put the butter and sugar in a freestanding electric mixer with a paddle attachment (or use a handheld electric whisk) and cream on slow speed until light and fluffy. Turn the mixer up to medium speed and beat in the egg and treacle, scraping any unmixed ingredients from the side of the bowl with a rubber spatula. 
Turn the mixer back down to slow speed and slowly add the flour mixture a couple of tablespoons at a time, stopping often to scrape any unmixed ingredients from the side of the bowl with a rubber spatula. Once an even dough has formed, take it out of the mixer, divide into 3 and wrap each piece in clingfilm. 

Leave to rest overnight in the fridge. 

When you are ready to bake the cookies, preheat the oven to 170°C / 150°C Fan / (325°F) Gas 3.Take the dough out of the fridge and leave to soften for about 10 minutes. Lightly dust a clean work surface with flour and roll out the dough to a thickness of about 4 mm with a rolling pin. Cut out shapes with the biscuit cutters. Arrange the cookies on the prepared baking trays and bake in the preheated oven for about 10–15 minutes. 

Leave the cookies to cool slightly on the trays before turning out onto a wire cooling rack to cool completely.

image

Once completely cooled. I didn’t bother with the royal icing.  I simply put 3 tbsp of icing sugar in a bowl and mixed with the juice from 1/2 a small orange. I then placed half the icing in a piping bag and coloured the other half with a drop of red food colouring. I then piped the eyes and mouth and other designs.

The end result a really lovely gingerbread cookie. 

Marshmallow Cupcakes

Cupcakes are one of the most requested goodies to be baked in our kitchen.  These are the best cupcakes ever.. according to Imana.

I love the Hummingbird Bakery and Imana choose to bake these from the picture she saw in their cook book. 

image

You will need

120g plain flour
140g caster sugar
1 1/2 teaspoons baking powder
a pinch of salt
45g Unsalted butter at room temperature  (omit the the salt if using regular butter)
120ml whole milk
1 egg
1/4 teaspoon vanilla extract
12 medium pink marshmallows
200g mini marshmallows for the frosting
12 hole cupcake tray lined with paper cases

Frosting recipe below

image

Preheat oven to 150oC Fan / 170oC / 325oF / Gas mark 3.

Place the flour, baking powder,  salt and butter in a mixer with paddle attached.  You can also use a handheld whisk. Beat on slow spped until everything is combination and you have a sandy texture. 

Gradually pour in half the milk and beat until incorporated.  Whisk the egg, vanilla and remaining milk together in a separate bowl or jug pr whatever you have the milk in. Then pour that into the mixture and continue to mix until incorporated. 

Scrape the sides and bottom of the bowl and continue to mix until the mixture is smooth.  Be sure not to over mix.

Spoon the mixture into paper cased until two-thirds full and bake in a preheated oven for 20 – 25 minutes or until light golden and sponge bounces back when touched.  A skewer once inserted into the centre should come out clean. 

Leave cupcakes to cool in the tray then transfer to a wire rack. 

Put the medium marshmallows in a heatproof bowl over simmering water. Leave until melted and smooth.  When cupcakes are cold hollow out a small section in the centre of each and fill with a dollop of melted marshmallow.  Leave to cool.

Stir in mini marshmallows into frosting by hand until evenly dispersed.  Spoon the frosting on top of the cupcakes and decorate with edible glitter if desired. 

Frosting

250g icing sugar, sifted
80g Unsalted butter
25ml whole milk
A couple of drops of vanilla extract

Beat icing sugar, butter in a mixer with the paddle attachment until mixturr comes together and is well mixed.  Combine milk and vanilla and add to butter mixture a couple of spoonfuls at a time.  Once all the milk is mixed in beat on high speed for 5 mins. The longer it is beaten the fluffier it becomes. 

Imana’s Favourite Shortbread

My 3 1/2 year old daughter loves baking and helping in the kitchen.  She loves making cookies. Rolling out the dough and choosing which cutters to use. This is such a simple recipe.

image

Here’s a picture of Imana’s Easter Cookies

Makes 12 (this depends on what size cutters you use as well)

225g plain flour
112.5g cornflour
112.5g icing sugar
225g butter diced

Start by sifting the flour, cornflour and icing sugar into a bowl. (I used a large one as Imana would have flour everywhere if it was a smaller one)

Rub the butter into the flour until the mixture becomes like fine breadcrumbs.  Bring the dough together.

Top tip I use 2 sheets of parchment paper one on the bottom place the dough onto the parchment paper and place another sheet ontop and using a rolling pin, roll the dough out till it is about 1 cm thick.

Now the fun starts cut out the cookies and place on a baking sheet lined with parchment paper and place in the fridge for 30mins to 1 hour. This is for the butter to firm and for better texture cookies. (If you dont have time place the cookies in the freezer for 5 – 10mins)

If you are not baking with the family you could simply place all the ingredients in a food processor and blitz till the dough come together. Roll out and chill the dough.

Once the dough is firm. Preheat the oven to 130oC Fan / 150oC / 300oC F / gas mark 2 and bake for 45min to 1 hour. (If you make really small cookies bake for 30 – 35 mins. Cookies should be light in colour and not brown).

Leave to cool a little then transfer to a wire rack.

These cookies can be enjoyed the as they are or they can be iced and decorated with loads of sprinkles.

Clementine Cake

I was browsing twitter and was inspired to make this recipe. Its just so easy and really yummy too. Gluten and fat free…. It could be served as a pudding with some creme fraiche or as a cake.

Clementine Cake

  • 375 grams clementines (approx. 3 medium-sized ones)
  • large eggs
  • 225 grams white sugar
  • 250 grams ground almonds
  • teaspoon baking powder

Method

  1. Put the clementines in a pan with some cold water, bring to the boil and cook for 2 hours. Drain and, when cool, cut each clementine in half and remove the pips. Dump the clementines – skins, pith, fruit and all – and give a quick blitz in a food processor (or by hand, of course). Preheat the oven to gas mark 5/190ºC/375ºF. Butter and line a 21cm / 8 inch Springform tin.
  2. You can then add all the other ingredients to the food processor and mix. Or, you can beat the eggs by hand adding the sugar, almonds and baking powder, mixing well, then finally adding the pulped oranges.
  3. Pour the cake mixture into the prepared tin and bake for an hour, when a skewer will come out clean; you’ll probably have to cover with foil or greaseproof after about 40 minutes to stop the top burning. Remove from the oven and leave to cool, on a rack, but in the tin. When the cake’s cold, you can take it out of the tin. I think this is better a day after it’s made, but I don’t complain about eating it at any time.
  4. I’ve also made this with an equal weight of oranges, and with lemons, in which case I increase the sugar to 250g / 2¼ cups and slightly anglicise it, too, by adding a glaze made of icing sugar mixed to a paste with lemon juice and a little water.
  5. Additional information – for gluten free make sure that the baking powder is gluten free.

White Chocolate Cheesecake

Happy New Year Everyone!!!!!!!
Wishing you all a very happy healthy and prosperous 2014. There is something about this year that feels special. I am excited to see what this new year is going to bring. I suspect alot of change, which can only be a good a thing.

I made this yummy cheesecake over the Festive season. It is made with half fat Creme Fraiche and Ricotta.

This serves approx 10 people

Crust
165g (5 1/2oz) digetive biscuits crushed
66g (2 1/2oz) butter, melted

Filing
6 leaves gelatine
500g (1Ib 2oz) half fat creme fraiche
100g (4oz) caster sugar
2 tsp vanilla extract
100g (4oz) white chocolate, chopped
250g (9oz) ricotta cheese
chocolate curls or other sweets / edible glitter

1 x 18cm springform cake tin

– Mix together the biscuits and butter, then press into the base of the tin. Pop into the freezer while you
prepare the filing.
– Soak the gelatine in cold water until really soft approx 5 mins. Heat the cream fraiche and sugar really gently in a small saucepan until the sugar dissolves. Keep stirring. Add the softened gelatine (squeeze out excess water) and vanilla and stir until the gelatine has dissolved. Leave to cool.
– Meanwhile, melt the chocolate in a bowl over simmering water. Whizz up the ricotta in a food processor until smooth, then add the melted chocolate and the cream mixture.
– Pour over the crumb base and place in the fridge to set, preferably overnight.
– Carefully remove it from the tin, a hot cloth around the edge will help to loosen it. Place on stand and decorate as desired.

This will keep in the fridge for 24hrs. If it lasts that long 😉

Princess fairy wands

Our daughter’s birthday is on Sunday.  I made these to send with her to school.  Quick easy no Mess NO fuss :). You will need skewers/ lolly sticks, sprinkles and coloured paste if you like.
Cookies
180g flour
50g caster sugar
120g butter
Zest 1 orange / lemon
Icing
120g icing sugar
1 egg white
Turn oven to pre heat @ 180oC (fan 160oC, gas 4).
Put flour,  sugar,  butter and zest into bowl and mix with hand mixer or processor till almost  coming together. 
Line baking tray with parchment paper. Put another piece of parchment on your counter top. Put the mixture on the baking paper on counter top and roll till about 1cm thick.  ( this keeps your work surface clean).
Cut out shapes using cutter(s) and place on baking tray. Push skewers / lolly sticks into the cookies enough do they wont fall out.
Bake for 10 – 12 mins until golden to make sure they are cooked. Allow to cool before removing.
Whisk egg white then beat in icing sugar until you have a thick paste.  Using a teaspoon drizzle or drop icing over cookies then add sprinkles and leave to dry.

Best ever Coffee Cake

I love this recipe as it is so easy and has never failed. To make it super simple and super quick place all the ingredients except the coffee mixture into a food processor and blitz.  Add dissolved coffee and blitz again. Place mixture in baking tin (s) smooth the top and bake.
You can either bake it in two 20cm / 8 inch round baking tins of in one rectangular tray bake tin.
The cake is moist and delicious.  I got the recipe from one of my favourite cookbooks by Mary Berry.
If you like an alternative to the icing  you could top the cake with chocolate ganache and add toasted almonds to the sides or decorate with chocolate covered coffee beans ( which can be found in Earls or Tk Maxx of all places). I hope you enjoy making it as much as I did.
225g (8oz) very soft butter, plus more for the tins
225g (8oz) light muscovado sugar or caster sugar
225g (8oz) self-raising flour
1 tsp baking powder
4 large eggs
4 level tsp instant coffee, dissolved in 1 tbsp boiling water
For the coffee icing
175g (6oz) soft butter
350g (12oz) icing sugar
4 level tsp instant coffee, dissolved in 1 tbsp boiling water
Preheat the oven to 180C/160C fan/350F/315F fan/Gas 4. Butter and line the base of two deep 20cm (8in) sandwich cake tins.
Measure all the cake ingredients, except the coffee, into a large mixing bowl and beat together until smooth. Stir in the dissolved coffee until thoroughly blended. Divide the mixture evenly between the two prepared tins and level the tops.
Bake in the preheated oven for about 25–30 minutes until golden brown, shrinking away from the sides of the tin and the sponge springs back when lightly pressed.
To make the icing, mix the butter and sugar together in a mixing bowl and beat together until smooth. Beat in the dissolved coffee and divide into four. When they are cold, slice each cake horizontally in half, giving four layers of cake. Sit one base on a cake stand and spread with a quarter of the mixture. Continue layering up with cake and icing so you finish with icing on top and swirl to give an attractive finish.
The cake can be made and iced up to two days ahead, kept covered in the fridge. Iced or un-iced, it freezes well.
AGA COOKING
Two-oven Aga: bake on the grid shelf on the floor of the roasting oven, with the cold sheet on the second set of runners, for about 25 minutes, until golden brown. Three and four-oven Aga: bake on the grid shelf on the floor of the baking oven for about 25 minutes. If getting too brown, slide the cold sheet on to the second set of runners.

Gluten Free – Plum and Cinnamon Cake

Had a ladies bible study lunch to attend and had loads of plums in my fruit basket. Lovely cake easy to make, takes a little longer to bake then most but you could be doing something else while it is in the oven. 

Preheat the oven to 160oC / 140oC Fan / 325oF / Gas 3
Put butter and sugar into a mixing bowl and whisk till light and creamy. Add the eggs one at a time, whisking after each addition. Sift in flour and cinnamon, add the ground almonds and whisk again. Spoon the batter into the prepared tin and level the surface. 
Arrange the plums, cut side up over the top of the cake and scatter over the blueberries and sprinkle with sugar.
Bake in preheated oven for 1 1/2hrs or until cake is firm to the touch and knife I settled into the middle comes out clean. 
Remove from the oven and let cool in the tin for 10 mins then turn out onto wire rack to cool completely. Dust with icing sugar and serve with whipped cream. 
This cake with keep for up to 3 days in an airtight container. 

Chocolate Malteser Cake

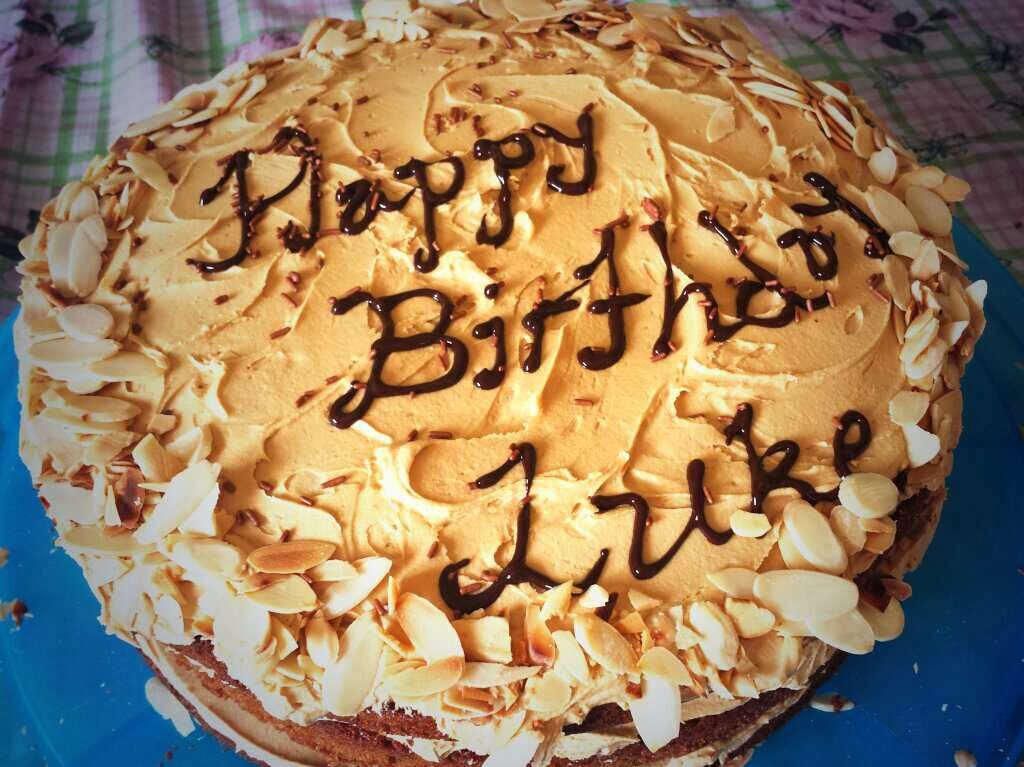
I made this cake for my brothers birthday. I got the recipe from Lorraine Pascale’s latest book. I love this recipe as it is really yummy but also because it is so easy to make. You put all the ingredients in a food processor or mixer at once and voila the cake is ready to bake. How easy is that… 
 
Make sure the butter is really soft otherwise you will en up with lumps of butter in your cake batter. 
 
Happy Baking 😉 x x x  
Prep time: 15 minutes, plus 25 minutes to cool and 20 minutes to decorate.


Time baking in the oven: 25-30 minutes


SERVES 8-10

SPONGE

  • 150g • 5oz really soft butter,
  • plus a little extra for greasing
  • 250g • 9oz caster sugar
  • 150g • 5oz self-raising flour
  • 125ml • 4½ fl oz sour cream
  • 4 medium eggs (at room temperature)
  • 50g • 2oz cocoa powder
  • 1 tsp baking powder
  • pinch of salt
  • ½ vanilla pod (or few drops of vanilla extract to taste)

BUTTERCREAM

  • 100g • 3½ oz dark chocolate (minimum 70 per cent cocoa solids)
  • 550g • 1¼ lb icing sugar
  • 250g • 9oz really soft butter
  • 2 tbsp milk (or water)

TO DECORATE

  • 4 x 135g packets of brown or
  • white Maltesers (optional)


♥ Preheat the oven to 180C (fan 160C), 350F, gas mark 4, with the middle shelf at the ready. Grease 2 x 20cm • 8 in loose-bottomed sandwich cake tins with a little butter, line the bottoms with discs of baking parchment and sit them on a large baking sheet.
♥ Put the butter, sugar, flour, sour cream, eggs, cocoa powder, baking powder and salt in a large bowl or in a freestanding electric mixer or a food processor. Split the vanilla pod open, scrape out the seeds and add them also (or the vanilla extract). Then mix or blend to give a smooth, soft mixture.


♥ Divide evenly between the cake tins, smooth the tops and place in the oven for 25-30 minutes.


♥ To check the cakes are baked, insert a skewer into the middle of each cake and if it comes out clean, then they are ready to come out. Remove them from the oven and leave to cool in the tins for a few minutes before carefully removing and leaving to cool completely on a wire rack (about 25 minutes).


♥ When the cakes are almost cool, start making the buttercream. Break the chocolate into a medium bowl and melt it in the microwave in 30-second blasts, stirring inbetween. Otherwise, sit the bowl of chocolate on a medium pan of simmering water, making sure that the water does not touch the bottom of the bowl, as this may make the chocolate grainy.


♥ Sift the icing sugar into the electric mixer or processor bowl (or large bowl if doing by hand). If I use a food mixer or processor for this, I don’t worry about sifting it as the blade will do a good job of blending any lumps. Add the butter and milk (or water) and beat until it is really light and fluffy. You will need to do this like mad if blending by hand. Then pour in the melted chocolate, stirring all the time.


♥ Sit one of the cakes on a serving plate or cake stand. I often put a little dollop of buttercream underneath the sponge so that the cake doesn’t move around. Then put about a third of the buttercream on and spread it around. Then sit the other sponge on top and spread the remaining buttercream all over so it is completely covered. It doesn’t need to be perfect. Doing this is a great excuse to get nice and messy.


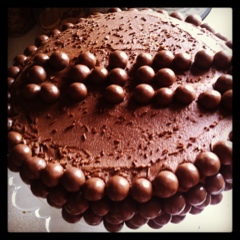
♥ Once you have covered the cake, and of course yourself, suitably in chocolate, take the Maltesers and stick them all over the cake. I am pedantic about this as I want the balls to be in strict rows, so I start at the base of the cake and then go in a line, up the sides, over the top and down the other side. I am not ashamed to say that rulers have been used in the decorating of this cake for a super-sharp line! Line them up nice and tight with no gaps.